|
فارسی | English |
 |
Hi ! I'm Mehdi . In this tutorial I will show you how we can create an egg
and how making texture for it . May be it's very banal for you , but I think it's very useful for the beginners [ actually I wrote this tutorial for the beginners like me , not for professionals ] Softwares
Summary |


| AutoDesk 3ds Max 9 | ||||||
 |
At first we must create a sphere with these parameters : Radius:2.5cm Segments:32 |
|||||
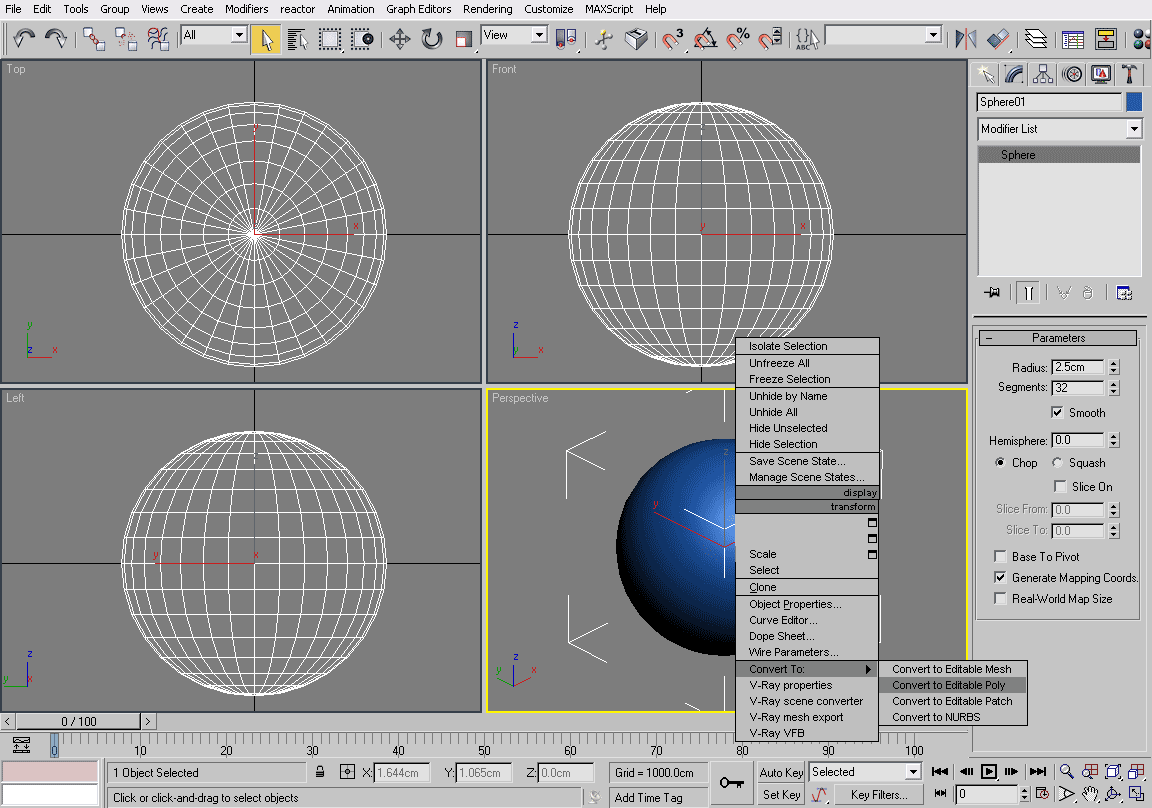 |
Now , we convert our sphere to Editable Poly , for this , select the sphere if not selected and right click on the scene , go to "convert to" and select "convert to editable poly" . | |||||
 |
In this step , we must give oval shape to our sphere . for this , select
the sphere if not selected , then go to modify panel , in selection part
select "Vertex" and all vertexes will appear
in all views . Now select upper vertex of sphere ( you can use front view to select it , if vertexes are mixed together in perspective view. it mokes it yet easier if use zoom to close to vertex) . Open "Soft Selection" part if not open and check "Use Soft Selection" . A gradient ramp will appear on the vertexes from red to blue . Increase or decrease value of "Falloff" until blue color reach to vertexes in middle of sphere . I use 3.2cm for Falloff . |
|||||
 |
Now active front view and select "Move" tool
from main menu and move vertexes in Y-Axis . Move them until you find best
location . Our egg is ready to cook! |
|||||
 |
We must export our model to DeepUV on this step , so open file menu and select "export" . Select *.OBJ in the file type menu and save it . When you click on save , a dialog box will appear . It's better that we use "Polygons" in the "faces type" | |||||
| DeepUV v1.3.0.9 | ||||||
 |
Ok . Now run DeepUV . Click on Open icon and browse to find your Obj file that saved in previous step . | |||||
 |
Select "Rotate tool" and rotate your model
in "Perspective" window to have a better view
. From the main menu , click on "Select" and choose "All" . |
|||||
 |
Select "Materials" tab from command panel at right , click on "Material#1" and click on "Assign to polygons" button . You can see result in "Material" window at left . | |||||
 |
Select "Mapping" tab from command panel and try "Planar1" or "Planar2" button to have a result like me in Material window . I used Planar2 in my tutorial . | |||||
 |
Active Material window and click on "Edit" from main menu , then select "Free Transform" . Transform control box will appear around the map , hold down {shift} button on your keyboard and rotate your map 90 degrees clockwise to have a result like me . | |||||
 |
Click on "Lift" button from tools section in command panel . You can see result in Material window . | |||||
 |
Now we must bind two parts together , for this , we must zoom on vertexes are in edges . I started from first vertex in the middle of map . Choose "select" tool and select the first vertex . When you select it , it change to red color and the opposite vertex change to pink color . In fact , these two vertex are one vertex , you can see this in perspective window . you must select both of them . for this , hold down {Ctrl} button on your keyboard and select the other vertex . Now click on "Join" button from tools section in command panel . | |||||
 |
Continue this work until all of vertexes bind together . I did it from middle to top and middle to bottom . | |||||
 |
Now , it's magic time . click on "Relax" button
from tools section in command panel . Wait to finish progress . Now our
unwrap map is ready . The only work you must to do , save your work by click on "File" on main menu and click "Save" . |
|||||
| AutoDesk 3ds Max 9 + Texporter v3.4.7.9 | ||||||
 |
We must Import our model to 3ds Max . for this , click on "File" in main menu and choose "import" , browse to find egg model and click "Open" . A dialog box will appear ,uncheck the "Obj smooth groups" and click on "OK" . | |||||
 |
Now we must load Texporter utility . For this , click on Utilities tab ,
click "More…" button , and find Texporter from
the list , click on it and click "Ok" . Texporter parameters will appear . |
|||||
 |
It's enough to determine your render's dimension and input width and height in the image size (pixels) . Then click on "Pick Object" button and select your egg . After some little moments your render is ready . | |||||
 |
Save your render for base of texture . | |||||
| Adobe Photoshop CS2 | ||||||
 |
Open your render that you save it in previous step . This is base of your texture and you can work on it and create your texture . For begin , I used one of shapes you can see here . At first I deleted some parts and then deformed it by free transforming . | |||||
 |
For better work , decrease opacity of this layer to 30% . In this step we must use "warp mode" transforming and move some points . You can see some of them on this pic . We must embed the shape in a 4x4 square , you can see it on pic . | |||||
 |
I create 4 shapes and embedded them on correct place , then create a copy
from them for the other side of texture . I Hope this tutorial could help
you, however a little . |
|||||
| :: Samples :: | ||||||
|
||||||


